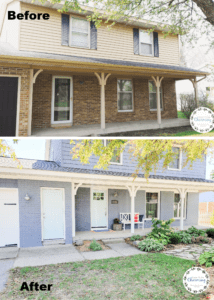
Exterior Home Makeover
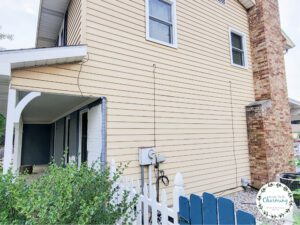
From the first moment we moved into our mustard yellow 1970’s home, I dreamed of what the home could be. Within 6 months, I had all kinds of paint samples up on the exterior of the home. Always dreaming about what a home makeover would look like. However, the paint samples sat for 7 years. Unfortunately, things like a roof and windows had to come first. I mean is that really more important than living in an ugly mustard colored house? OK, don’t answer that!

Our original plan for our home makeover was to paint the siding, but a quote revealed painting was not that cheap of an option. Plus, the more we starred at our siding the more we realized it was not in great shape. The old aluminum siding had lots of holes and dents, which even with a nice coat of paint would not go away. The decision was finally made to reside the house and to do it ourselves. Yup, over confident, budget savvy with no experience, DIY at its finest!
However, I knew we would figure it out and we did! Our home makeover turned out amazing! I am so excited to finally share this reveal with you, here is everything we did for our exterior house makeover.

Planning For An Exterior Home Makeover
I am not going to lie, this was a huge project! It wasn’t that the siding was too hard, there are just so many things involved. Without staying organized it would have been easy to get overwhelmed. The Home Project Guide that I created was a huge help! I offer the bundle in my Etsy Shop and would highly recommend it if you are about to tackle a huge project or even if you just have a bunch of small house projects. I never plan a project without it!
Choosing An Exterior House Color Palette
Even though design and colors are something I love picking out, choosing colors for the exterior of your house is a big deal! Over the years, as I dreamed about redoing my house, I must have scrolled through thousands of pictures. I made sure to save anything that stuck out to me and note what I liked about the image! Pinterest and Houzz are my two favorite sites to look on.
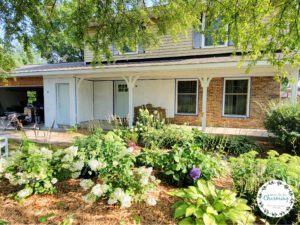
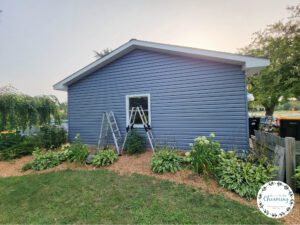
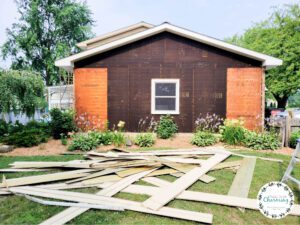
For a while, we were considering SW Intellectual Gray for our house. We even painted our shed that color to see if we would love it on our house. I did! However, when we changed from the idea of painting our house to residing, I just couldn’t find a color of siding that I liked as much as the Intellectual Gray color. Plus one day as I was looking around from our back yard, I realized how many houses in our neighborhood were similar to that color. A blue house was not something I had originally imagined, but when I saw the siding sample I felt like it just fit us!
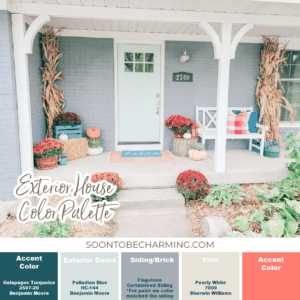
Just The Right Colors
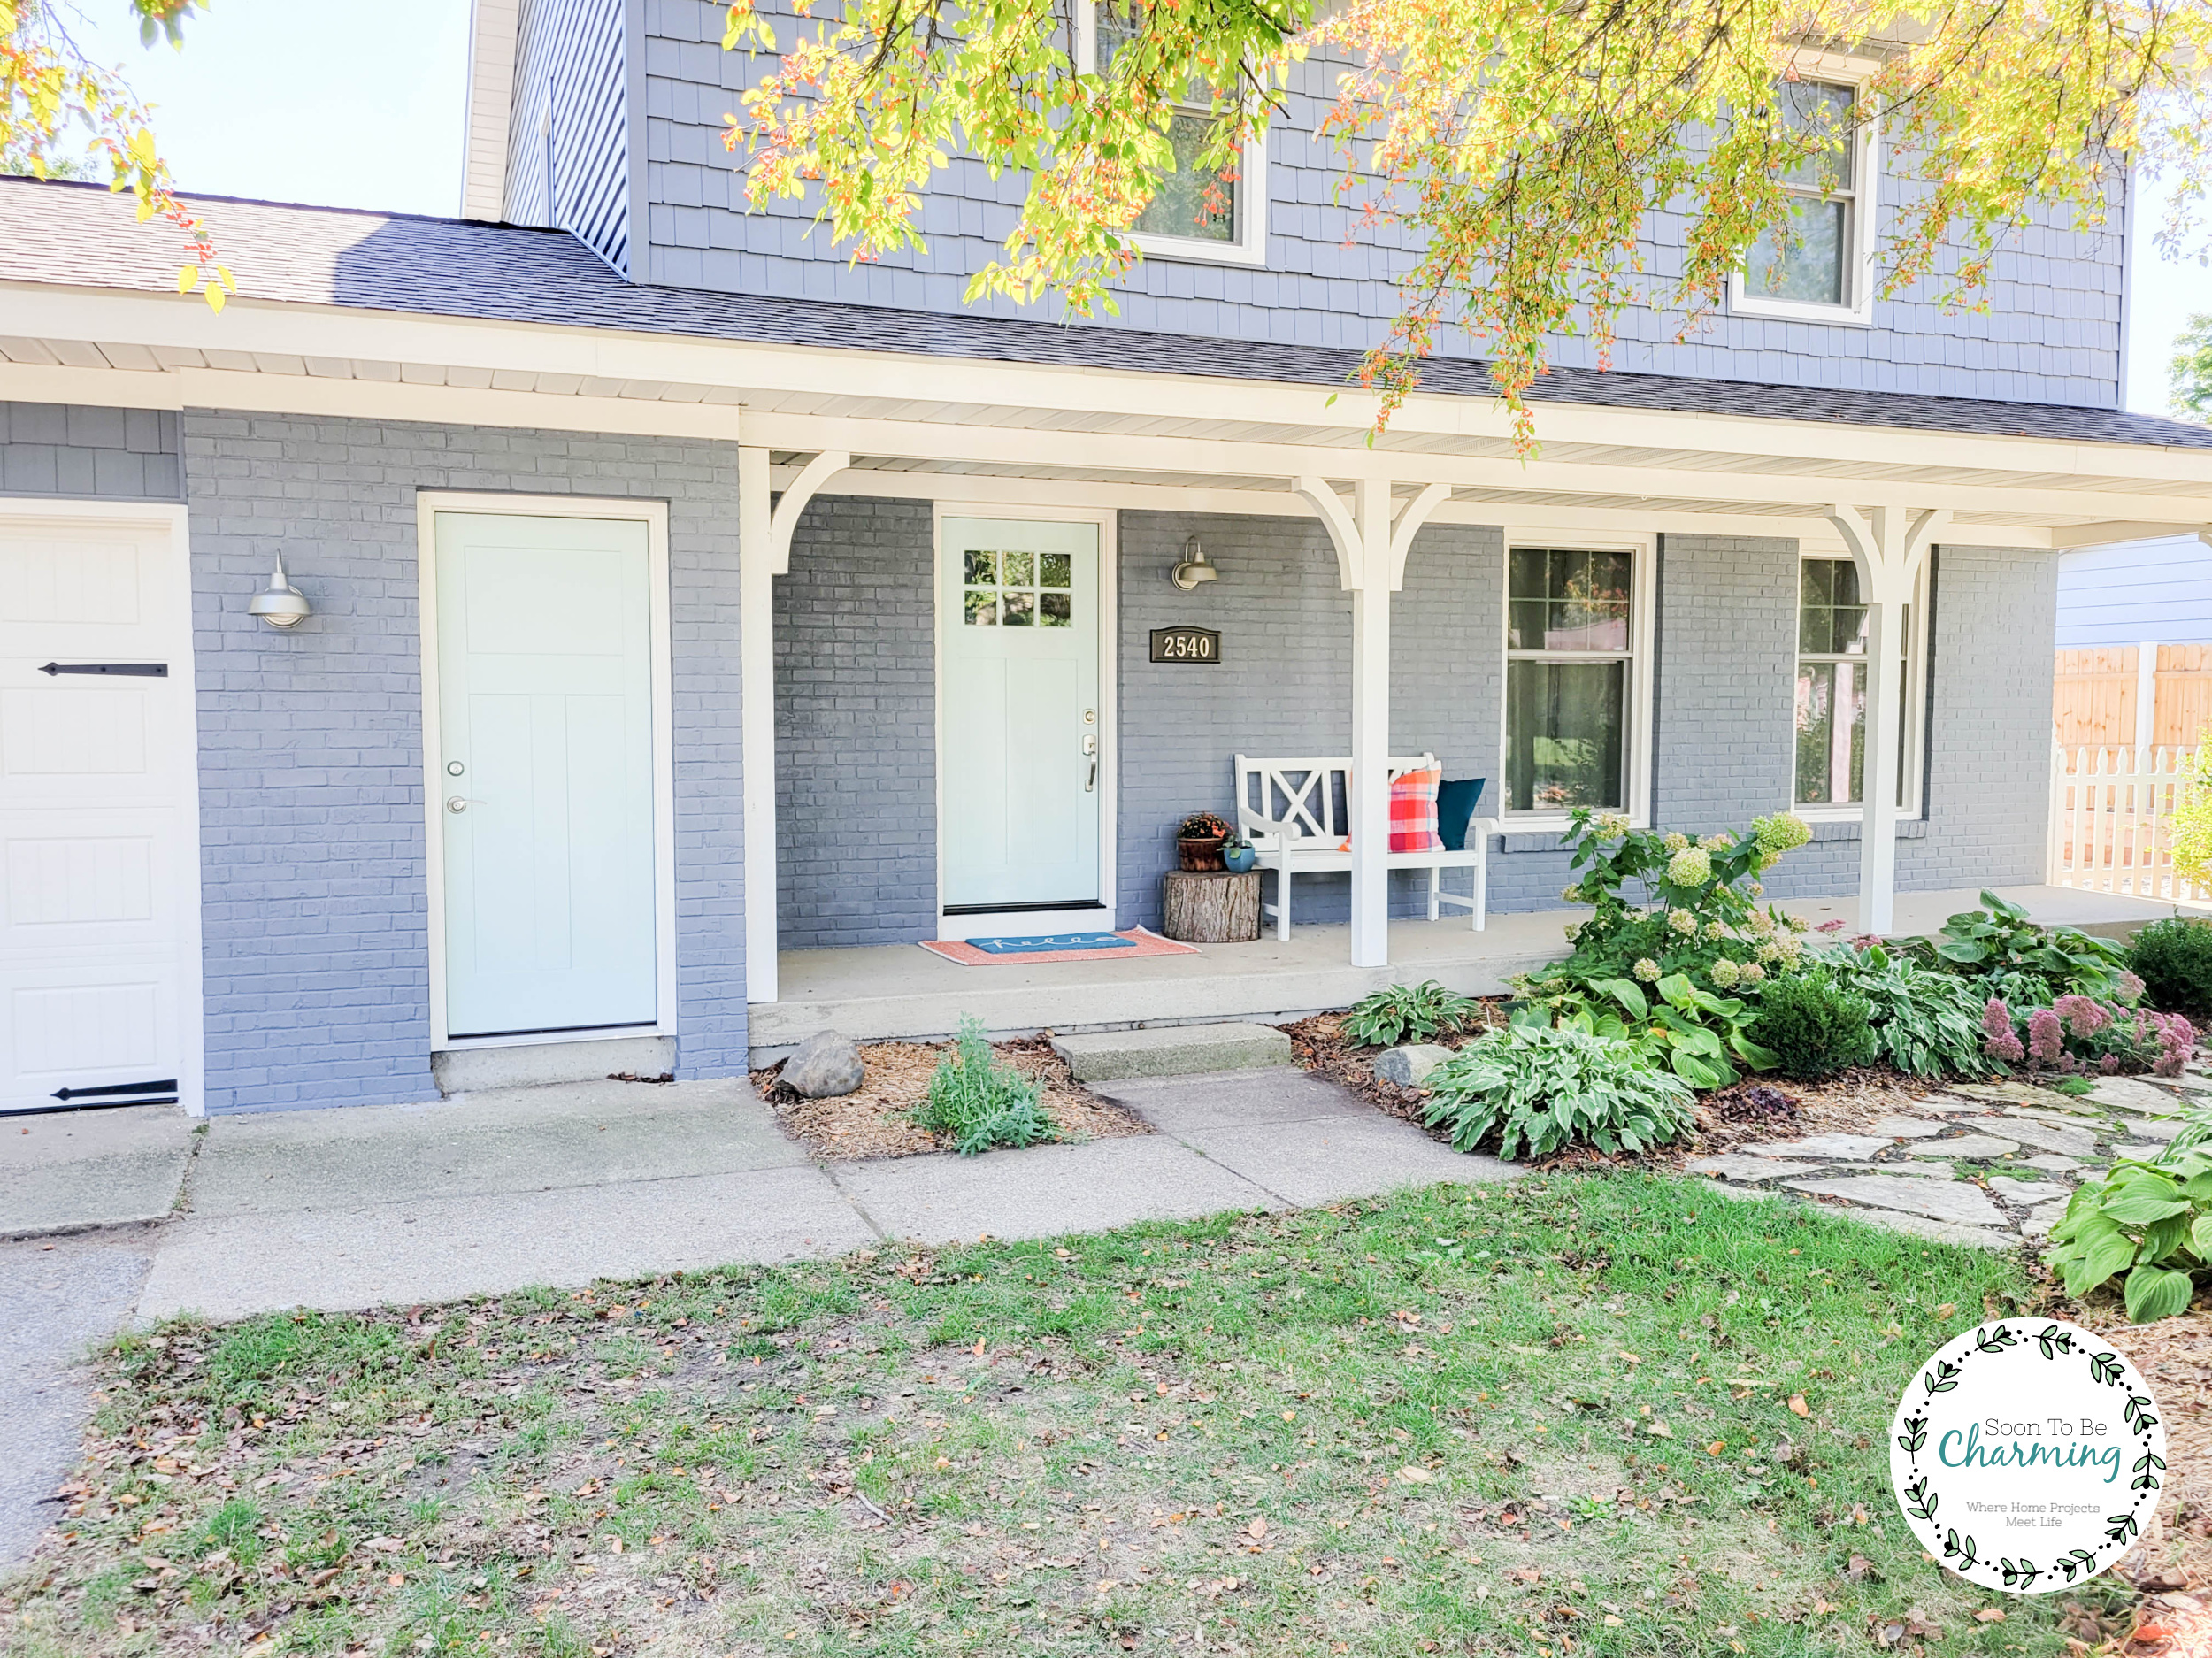
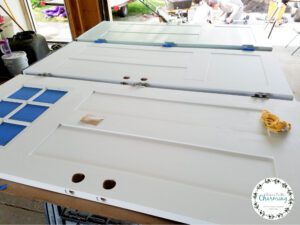
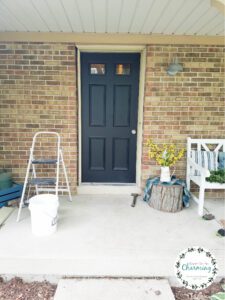
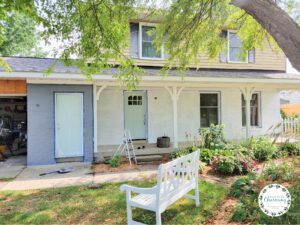
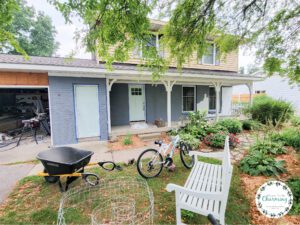
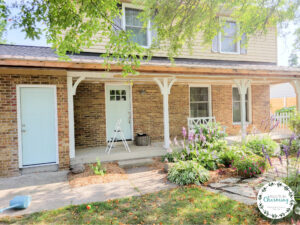
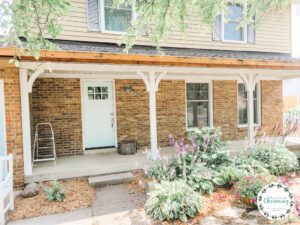
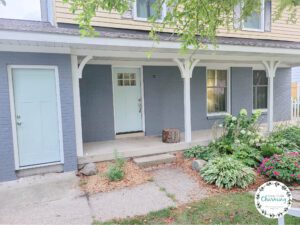
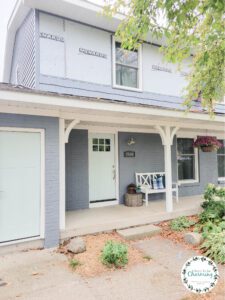
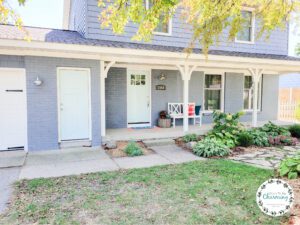
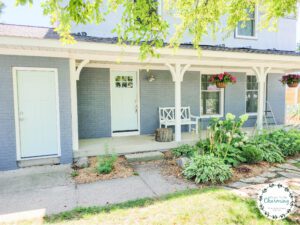
We do live in an older neighborhood, with very subtle house colors. Instead of choosing a really bright blue color, we choose Flagstone from Certainteed. In some light it looks very blue, and in other lighting it looks almost gray. We really love the color! For trim, I love a soft off white color. I just feel like it is warmer and cozier than a bright white. Plus a creamy white goes so well with blue. Our trim color was Pearly White by Sherwin Williams and it is such a pretty color! For accents, we used BM Palladian Blue for all our exterior doors and BM Galapagos Turquoise for our garden gates and playhouse.
These colors look great together and then allow me to decorate with all kinds of color! Oranges, pinks, and reds would all be great accent colors. I can easily change my decorations for the 4th of July or Christmas and they will look great with our house colors. It may sound crazy, but when I picked the door color I definitely thought about decorating!
It’s Never Just Siding
One thing you can count on is one project always leads to another, especially with old houses. Before we could even think about siding, we had a long list of to do’s to get finished first!
Here are the Projects that we needed to do before tackling the siding project:
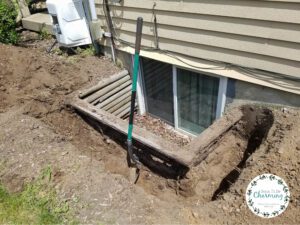
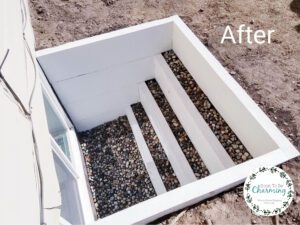
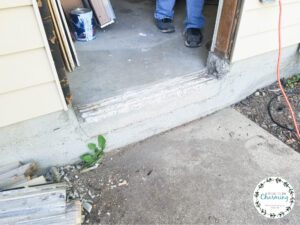
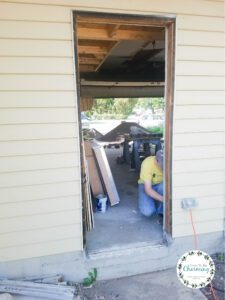
Project 1: Rebuild the egress
Egress Before: The egress needed to be sturdy so we could put up scaffolding, in the current condition, it was literally crumbling. It was not something you would feel comfortable putting scaffolding up on! Hence project 1!
Egress After
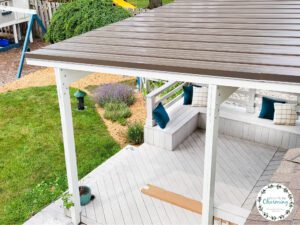
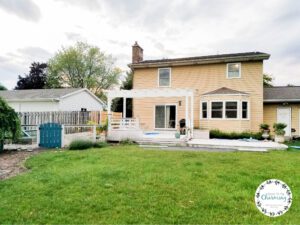
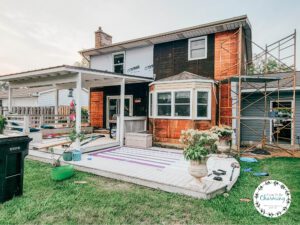
Project 2: Our Pergola Makeover
The Pergola Before: We added a metal roof to our pergola for many reasons, why we needed to get it done before the siding? It served as a great platform to walk on and then we were able to reach the back upper part of the house!
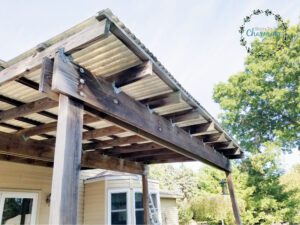
Pergola After
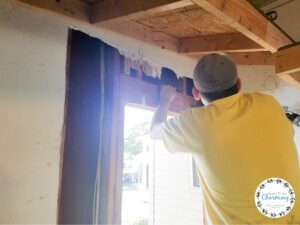
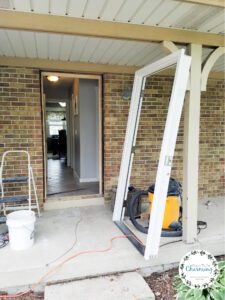
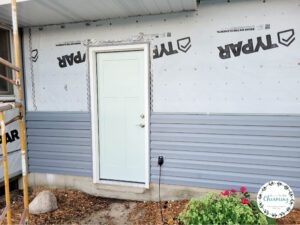
Project 3: Replace all the Exterior Doors
Our exterior doors were old, drafty and a couple were rotting. Before siding, we wanted to replace all of them before siding because we were making the doorways wider! But why?
As I mentioned, nothing is ever easy with an old house. The service doors or man doors as some people say, were 30″ openings. If you have ever looked for 30″ doors, you will realize that it is slim pickings when choosing door styles.
Most doors nowadays are 32″ or 36″ openings. Let’s just say I was not really happy with the selection and I hate to spend money on something I don’t love. Sure custom doors would be an option, but it wasn’t for our budget. So with all the love in my heart, I asked my sweet caring husband if widening the service doors was an option.
This Wasn’t An Easy Ask!
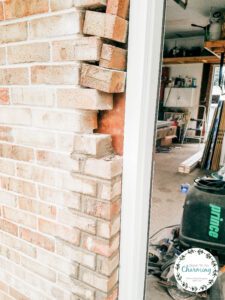
Just to give you a little background, the front man door is surrounded by brick! The back one we thought would be easy, thought being the key word, but ended up having to remove cement and extend the header. After a lot of deliberation (and without knowing what truly laid ahead), my husband said he could do it!
It was definitely a little time consuming, but overall everything went smoothly. Here is a very abbreviated list of what we did to widen the doorways!
Door 1 (back of garage)
We removed the back door, removed part of the cement foundation skirt, temporarily took down a storage shelf above the door (which was screwed into the header and very tightly installed), extended the header and installed the new door frame.
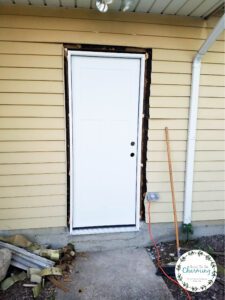
Door 2 (front door)
Door 3 (front garage man door)

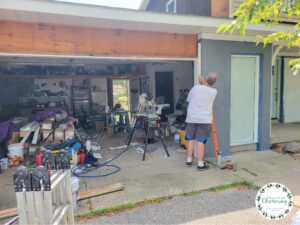
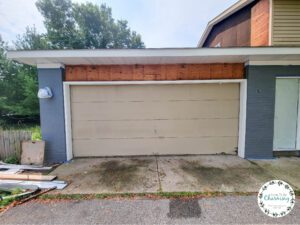
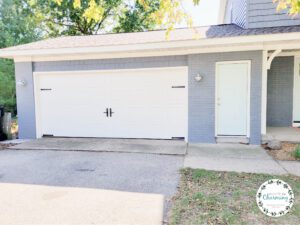
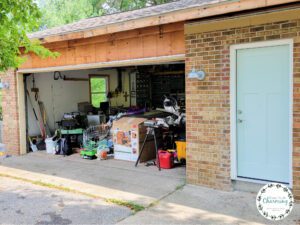
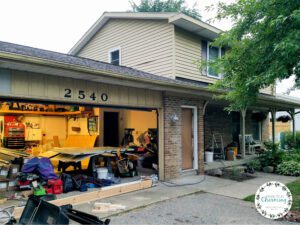
Project 4: Replace the garage door
In May, our garage door completely broke, thankfully it was already on our list to replace. However, it was going to be over 3 months to get a new one (it actual ended up being 5 months, with them sending the wrong color garage door the first time). After a month of manually opening it and clamping it up…my husband worked on it and was able to temporarily fix it. I was so thankful, it is such a pain not having a working garage door!
During this wait time, we began preparing. All new trim and seals were installed, thanks Dad! Once again it was one of those things that I had never really paid attention to, but after it was replaced it looked so much better! I coated the trim with SW Pearly White paint once it was up.
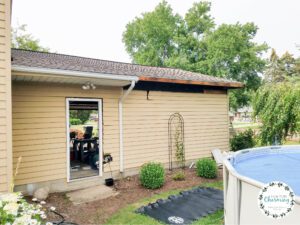
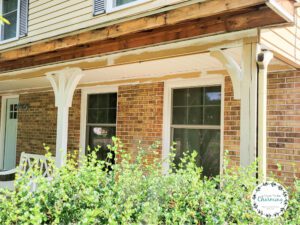
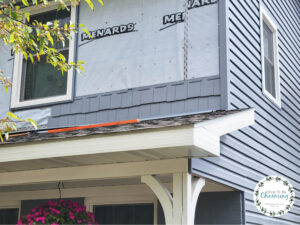
Project 5: Soffit and Fascia
Soffit and fascia, two words that have been in our vocabulary all summer. We went back in forth about just painting the fascia and soffit or replacing it. To help us decide, I took a sample piece scrubbed it and painted it. What I realized is no matter how much scrubbing I did, it would be very hard to get clean, plus it would be very time consuming. I feared that at the end of the project we might regret not replacing it when we had the chance. After a lot of back and forth, considering time and cost, we finally decided to replace it and I am so glad we did.
Soffit is pretty simple, just lots of cutting. Fascia is a little trickier, especially wrapping bird boxes (the corner boxes of the house). It took a little getting used to, but my husband does have experience with bending metal….so he definitely figured it out!
Slow but steady
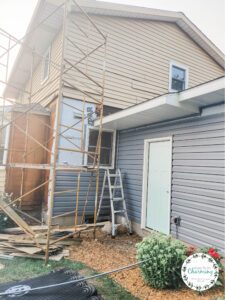
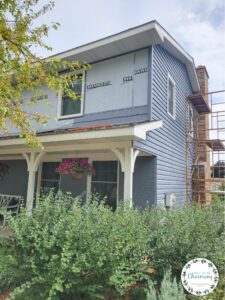
We replaced the soffit and fascia as we went, especially with a two story house. Our goal was to limit moving the scaffolding around as much as possible, so we finished one side at a time.
With our trim being an off white color, I ended up painting all the fascia before putting it up. On the corners where my husband bent it, I had to touch up the fascia, but I still feel like that was easier than painting it once it was on the house.
Here is a picture of all the fascia laid out on the deck. It was pretty easy to quickly roll the paint on!
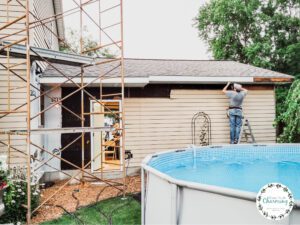
Here my husband is installing the new soffit. There is non-vented and vented soffit. We added vented soffit every third panel to get better airflow to our attics.

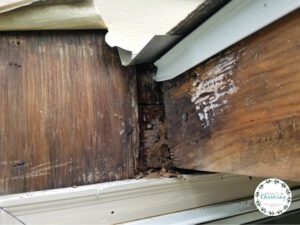
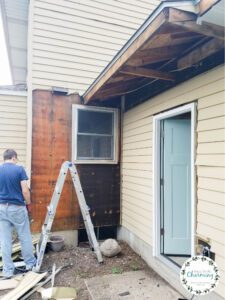
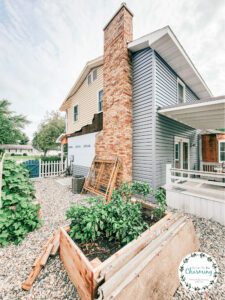
Surprise, we found rot!
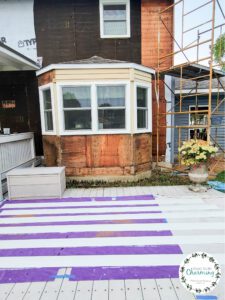
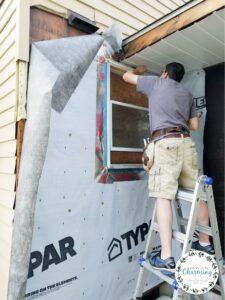
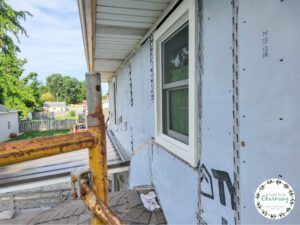
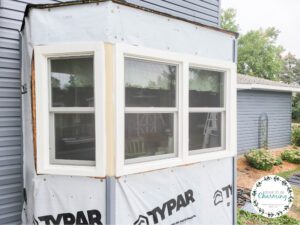
In the corner where the garage meets the house, we found rot! I can’t say that it was all that unexpected. We noticed a few years previously when we put a new roof on that they had not flashed properly along the roof line. Water would run down the roof and get underneath the siding. It looks like they had replaced the window shortly before we bought the house (probably trying to “fix” the water problem), but the issue was never addressed. The rot made us take a quick detour from our siding project.
My husband pulled the window out and replaced all the rotted wood. My dad was able to repair the top of the window and in 2 days we had the window back in. The window was sealed properly and now we knew the roof was flashed properly, the issue should be fixed.
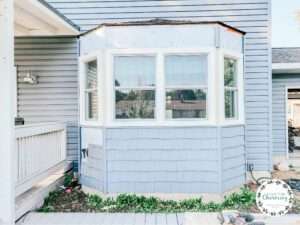
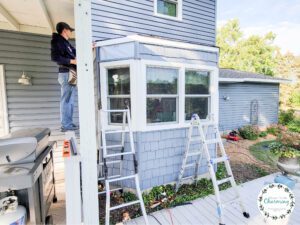
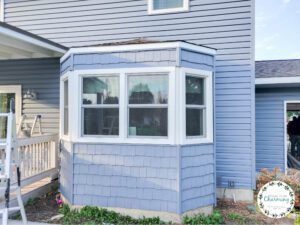
Whenever you pull siding off, you are bound to find issues. We just addressed them as we went and overall everything went pretty smoothly except the bump out in the back. Let’s just say, I’m glad its still part of our house. My husband was ready to take it down several times. Apparently it was an afterthought to the house and not built real well! Thankfully for me, the bump out made it! I love that little nook.
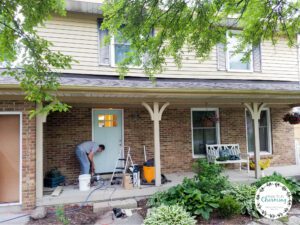
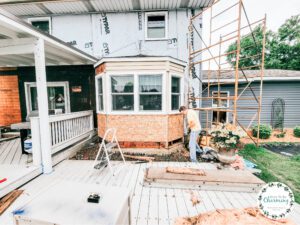
Project 6: Paint
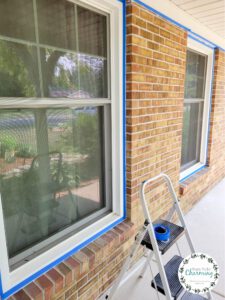
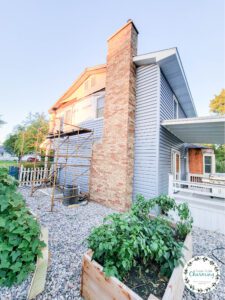
Painting the brick and the siding all happened at the same time! I was pretty much in charge of getting everything painted and my husband and cousin were in charge of the siding. My dad came over and handled a lot of the trim work and helped take trips to the scrap yard. Aluminum prices are great right now!
It seemed like there was always something to paint! I had a paint brush in my hands almost all summer. Painting the brick and the porch trim was the largest paint project. I also painted several other little things like outlet boxes (that only came in white), all the exterior doors, fascia as I mentioned above, the outdoor lights so they matched the door hardware and more. So many things needed to be painted that I can’t even remember everything!
For the porch, I started by painting the posts and trim. Simply painting that small amount, made the porch look so much brighter already!
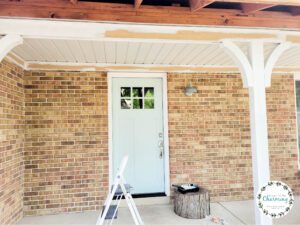
Next, I applied one coat of primer on the brick.
Lastly, I painted two coats of exterior paint. We color matched the paint to the siding. The goal was to unify the house, so I wanted to paint it the same color as the siding.
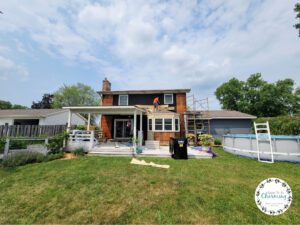
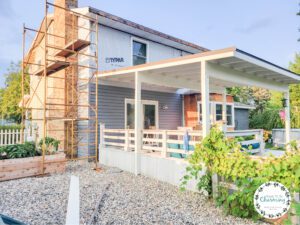
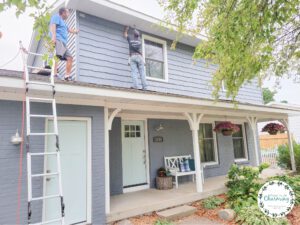
Project 7: Siding
Last, but never least, once all the other projects were completed (except the paint) it was time to tackle the crowning jewel….the siding! It had been sitting so patiently in our garage, we had ordered it in March and received it in May. Supplies are taking longer than ever to get and the last thing we wanted to do is wait for the siding to come in. Thankfully it only took a couple months to receive, so there it sat, ready in our garage…waiting for us.
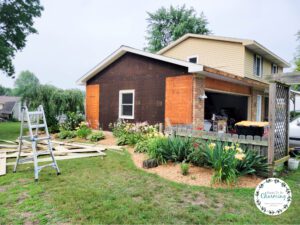
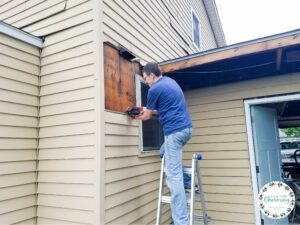
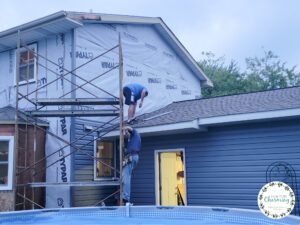
My husband started removing siding on the back of the garage and on the east side of the house first. It was the lowest area of siding and figured it would be a good place to start.
Hindsight, Even though all the walls are individual, it would have been better to start on the west side and just move our way around the house in a counterclockwise direction. Because we didn’t do that, we had to pay much closer attention to make sure the siding met up at the corners evenly.
If it didn’t, which happened just a couple of times, we had to redo some of the siding. A couple of times we didn’t realize a piece didn’t snap in quite right, they were all easy fixes…just a little time consuming. We also recommend investing in a nice laser level. It is very helpful to made sure you are level with the siding and to get the starter strips fastened perfectly level.
Basic Siding Steps For An Exterior Home Makeover
First Step: Remove Siding
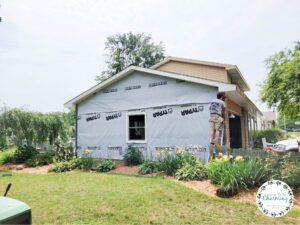
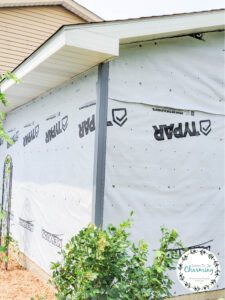
Second Step: Wrap
Third Step: Install Corner Posts, Starter Strip and J Channel
Fourth Step: Install Siding
Fifth Step: Repeat
See when you type it out it seems so easy! Haha, don’t tell my hubby that!
Siding Timeline For Our Exterior Home Makeover
The first siding was ripped off our house the middle of July. A majority of the siding was finished by the end of August, a few tricky spots like the bump out was finished in September. For an idea of how much time it really did take, my husband and cousin worked on the siding almost everyday. They would work from 4 or 5ish until dark. I worked on paint or house related things every day as well, along with my dad working on a lot of little extra things.
So Many Resources Available!
My husband has never sided a house before, so he did spend time watching videos and learning exactly what to do. The further into the project they went, the more they fell in rhythm. Building a jig to help cut siding pieces quicker was a big help. Having two people work together on the siding was also incredibly helpful. The height of a two story home does make it much more difficult for siding, even with scaffolding. However, at the end of the day, I feel like my husband and I would both agree in a heartbeat that we would do it again! Yes, it took more time to do it DIY, but it saved us a lot of money and allowed us to fix a lot of “hidden problems” that we found along the way. Now we know every little nook and cranny of our house, literally.
In order to show you the true progression of our house project and over 3 months of photos, I have created a gallery slideshow for you! Here is the grand transformation of our exterior house makeover! I hope you enjoy this labor of love.


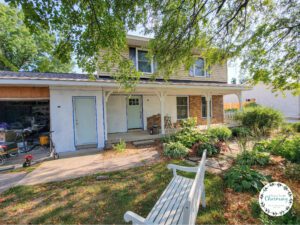

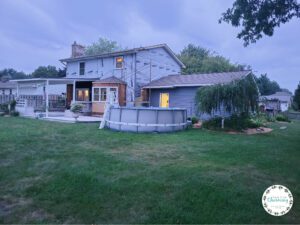
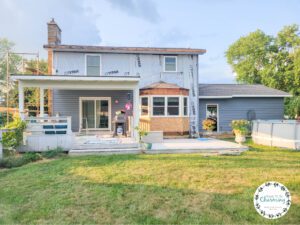
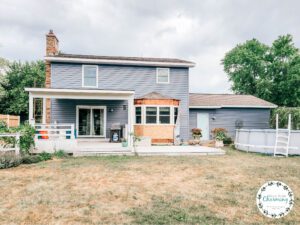


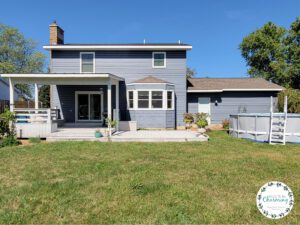

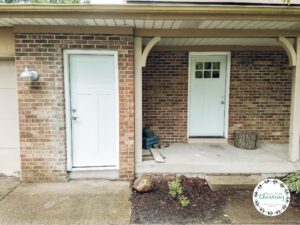
After 8 years of living in a mustard yellow, dented house with a rotting garage door, now I pull up to a beautiful, fresh, and welcoming blue house! The transformation has been amazing! I hope this inspires you! It takes a lot of patience, a lot of hard work…but the results will be worth it.
Thanks so much for checking out my post!

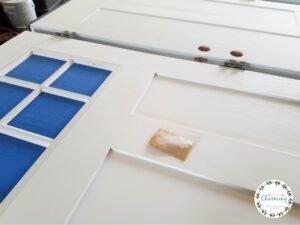
Good job! In my opinion, these white doors go well with blue siding. It looks fresh and cute.