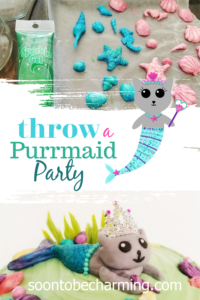
The Best Merkitty Birthday Party
When my precious and may I add, very low maintenance middle child, asked to have a merkitty birthday party…I thought no problem. However, it soon became apparent that merkitty party supplies don’t really exist. It is always much easier to throw a party when the theme actually exists…so I began talking to my daughter about a few other theme ideas. She continued to say ok to many of my ideas, but I could tell by her reactions that her heart was set on merkitties. So as every crafty, DIY mother would do, I set out to make her merkitty dreams come true.
Mermaid themes are very popular, so I figured that would be a good place to start. We found several mermaid tail supplies, which could easily be used for merkitties as well. I thought about doing all mermaid tails, but it is not really a merkitty birthday, without at least one merkitty present.
Finding Inspiration
The next place I looked was on Etsy, to find a merkitty image. I figured they would have something and thought if I could find a great merkitty image, I could create decorations myself.
This post contains affiliate links which means if you click on or make a purchase, I may receive a small commission at no cost to you. Thank you for your support!
I was finally gaining traction on this merkitty party. However, it quickly halted. I couldn’t find just the right merkitty image on etsy. It is a girls birthday party, so I wanted my daughter to love the merkitty image and I wanted it to look cute (as some merkitty images look a little weird). We were stuck.
Well when you can’t find what you need, create it yourself I guess. I mean us mom’s have nothing but time to burn, right? So I sat down and tinkered around in PicMonkey (where I create all my blog printables) and I came up with a merkitty. I have to say, it was an adorable Merkitty and the perfect image to be the star of a merkitty party. Plus my daughter loved it…which is really the only thing that mattered!
![]()
Merkitty Birthday Party Supplies
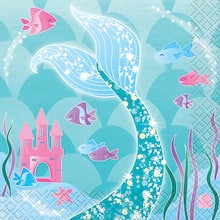
We decided on these mermaid tail plates. We loved the colors and then I customized my merkitty image to match. I found these plates on Amazon. Another option, which I considered, would be to take the merkitty image and create custom plates and napkins on a site like Zazzle.

Other supplies: we picked up purple cups and bought the same mermaid tail napkins to go with the plates. We were only serving cake and ice cream, so we really didn’t need any more supplies than that.

![]()
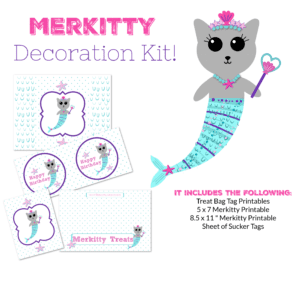
Merkitty Decorations
Having the plates decided is a big start because it gives you the color theme for the rest of the decorations. Since I was spending more time creating the merkitty, I decided to buy a decorating kit to help try to save a little time somewhere else. I found this decorating kit HERE.

The kit was great…and just a heads up, don’t wait until midnight the night before the party to pull apart the pom poms! Yes, that is coming from personal experience.
Along with the decorating kit, I used my merkitty image to create a few of my own. ![]() It was perfect to pull the merkitty theme into the decorations.
It was perfect to pull the merkitty theme into the decorations.
I made a printable that can easily be used to create hanging or table decorations for your party.
Use scissors to cut down the middle of the sheet and then attach it to a piece of cardstock. The cardstock will make it much sturdier. Trim any edges to make it even and then round the corners to add a nice finished look.
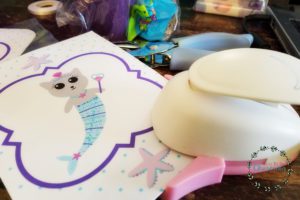
Finally, if you wish to hang it…punch a hole in the top and tie a string.

Treat Bags and Sucker Wraps
I bought blue jelly beans and tropical swedish fish to make merkitty treat bags. Print off the sheet and then trim the snack tag to match the size of your ziploc bag. Again printing it off on cardstock will help make it sturdier.
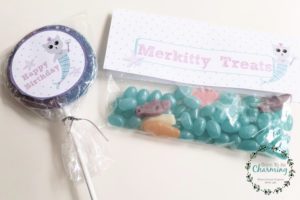
The same for the sucker tags…print them off, cut around the purple circle and then tape them on. This was actually a fun project for my daughter to help with. I bought these galaxy suckers from Party City (and just took the galaxy tags off).
Ready to throw your own purrmaid party? You’re in luck because now it is on Etsy!
Click HERE to purchase this kit on my etsy shop.
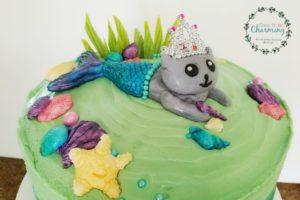
The Merkitty Cake
I had a lot of fun making the merkitty cake…and it is easier than you think! Here is step by step how I put it together.
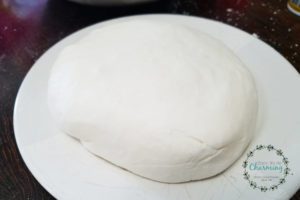
Step 1: Make Fondant
I made homemade fondant for the very first time. It is a marshmallow fondant recipe and I loved how easy it was to make. You can get the recipe from purewow.com HERE. One tip I can share, is don’t be afraid to use a lot of powdered sugar. Also, coat everything with corn starch…your hands, the spoon, the counter. Keep kneading the fondant until you don’t have any sticky spots.
*If you are not sure how much to make…one bag of mini marshmallows made all my decorations, plus I had a ton of fondant still leftover.
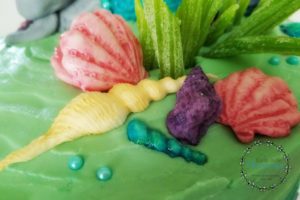
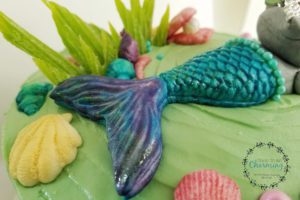
Step 2: Make Fondant Decorations
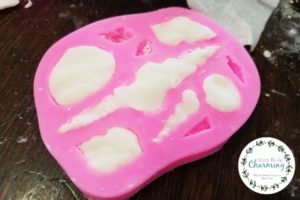
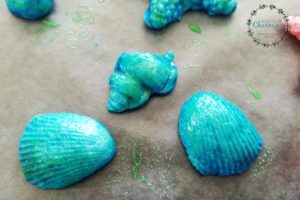
To create seashells and a mermaid tail, I bought silicone molds on Amazon. I have never used silicone molds before…so I was stumbling into unchartered territory. However, I was delightfully surprised how easy they were to make. It took just a little getting used to, but wasn’t hard.
Here are a couple things that will help:
- Line the silicone mold with cornstarch and then shake the remainder out before filling with fondant
- Chill the mold in the refrigerator, coat it with cornstarch and then add the fondant
- For the mermaid tail, put the fondant into the mold…then place it in the freezer for a few minutes (you can do this with the seashells too). After a few minutes, pull the mold back out of the freezer, and the tail should pop out easily. (I made two molds of the mermaid tail and put them together to make it look 3D)
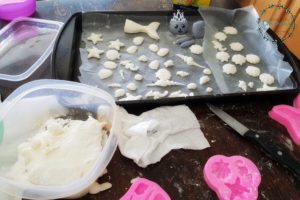
Once you finish making fondant decorations, leave them out on wax paper to dry out a little more. If you need to store them overnight, place them in an airtight container at room temperature.
Step 3: Color The Fondant
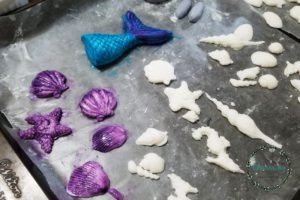
I used three different colors of pearl dust to paint the decorations, purple, blue and pink. To get started, pour a small amount of pearl dust into a bowl and then add a little vanilla or lemon extract. Mix the color up, and then apply with a food grade paint brush.
After one side was colored, I let it dry overnight and then flipped all the pieces over to paint the other side.
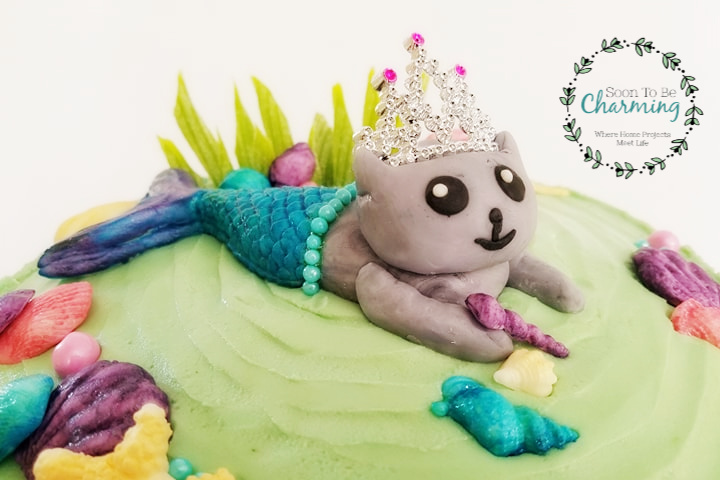
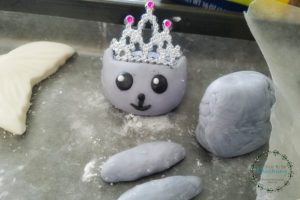
To make the merkitty, I kept it as simple as possible. I am not a sculptor and will never claim to be…so if I can do it, you can too!
- Take some of the fondant and color it with a small amount of black colorant, to make it gray.
- Roll out two arms, a body and then a ball for the head.
- Poke up two ears and place a crown on top (I bought this one at party city and broke off the comb that was attached).
- Roll two small black balls, place them onto the face and flatten them out for the eyes.
- Then roll two small white balls and flatten them onto the eyes.
- The mouth is a little trickier, but make a small nose and then roll one small string down and a small smile below it.
For the tail, I overlapped a few different colors to make it really stand out. You can have fun with this and make it any color you want.
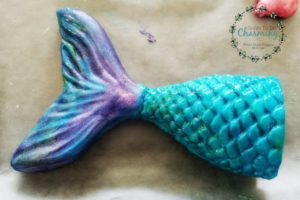
When I was finished, the blue was almost a little too blue for what I wanted…so I added some green gel sparkles to make them look more teal. It worked out perfectly!
Step 4: Bake The Cake
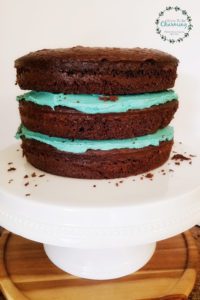
For the cake, start out by baking it as directed. I used two cake mixes to create a 3 layer cake. To help your cakes bake evenly, I love to use baking strips. A year ago my friend gave these to me, and now I never bake without them. I can’t believe I didn’t know about them sooner. If you haven’t heard of them, definitely check them out!
Step 5: Frost The Cake
I always make a homemade buttercream frosting.
GET THE BUTTERCREAM RECIPE ON MY POST CAKE DECORATING FOR BEGINNERS!
I make a batch for every layer…so for a three layer cake, I make a triple batch of frosting.
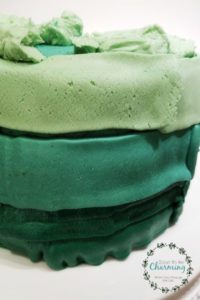
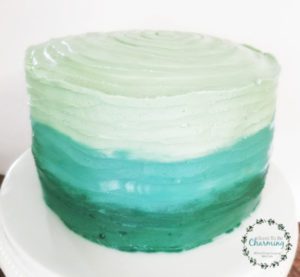
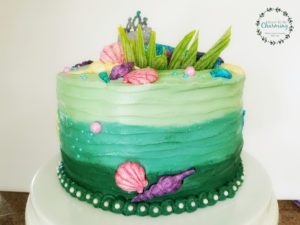
To get the ombre effect, I created three different colors. I mixed royal blue and moss green to get the teal/green colors I wanted. Then piped the frosting on one color at a time.
Step 6: Smooth Frosting and Add Swirls
Use a lazy susan or cake decorating turntable to go around and smooth out the frosting. The frosting colors will begin to blend a little.
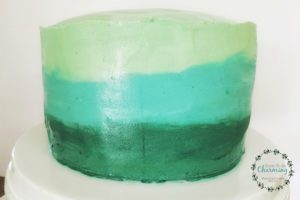
To add swirls, place your knife on the bottom of the cake and spin the cake around. Continue to move your knife up the cake up until you have reached the top. Once on the top, start at the outside and move in towards the center like a spiral.
Step 7: Add Decorations
Once your cake is completely frosted, it is time to add the decorations. First, I cut some green sour patch straws to create the seaweed. I varied the heights to make it look more natural. Next, I placed the mermaid tail onto the cake and then placed the merkitty head, body and arms. The easiest position was to place the merkitty like she was laying on the bottom of the sea.
To finish I placed seashells all around the cake, and added a few pearls. I also added a pearl belt between the merkitty body and tail to help cover the seam.
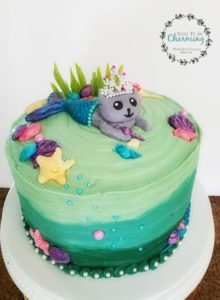
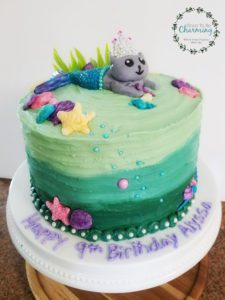
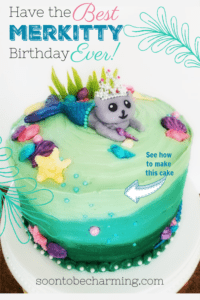
My daughter absolutely loved the cake…and I have to say I was excited on how her whole merkitty party came together! I hope yours will be a blast as well!
Thanks for checking out my post!!

Shop This Party!

![]()

![]()

![]()

![]()

![]()
![]()

![]()