6 Tips For Taking Your Own Family Photos
Fall is a great time to take family pictures! One because the fall color is gorgeous outside and secondly because Christmas card season is coming! I always love having family pictures taken, my husband and son not so much (although they are willing), and my girls it depends on the day! It can be stressful, especially the younger your kids are…but you’ll cherish those photos for years to come.
If you like to budget, family pictures can get expensive, but it doesn’t always have to be. I have taken most of our family pictures myself. I like the money it saves and the flexibility of not having to schedule a date way ahead of time. Taking your own pictures can have it’s challenges, but for us the benefits outweigh those challenges and provide a little comic relief. I’ll explain in a minute.
{This post contains affiliate links, which means if you click on or purchase an item I may receive a small commission.}
*Side Note: If you need some inspiration on poses, do some searching on Pinterest! You are bound to find all kinds of great family photos and look at how they are positioned.

The Photo Dash
On a typical shoot, I would get all the kids ready, set up my camera and a tripod. Then begin getting everyone into position. Once everyone was in place, I would set the camera to a delayed start and then press the shutter button. The camera would begin beeping and I would frantically dash into my spot. Sometimes, whipping a child up on my lap. As the timer beeped closer together, you knew it was about to take the picture. So at that last second, I’d get my hands into place and throw on that natural smile.
In all the excitement, the kids would be almost laughing and the intensity of me running back to my spot made everyone smile and at the same time super focused on getting a great picture. When the kids were really little, they were mesmerized by the beeping the camera made and they would just stare at it. I mean if they aren’t going to smile, at least they were looking!
This crazy process has continued year after year…I have actually become quite the acrobat!! The end result in the picture always looks cool, calm and collected…but it makes me laugh because I know it was everything but that.
Last fall I wanted to again take some family pictures. It had been a while and normally we take them for Christmas cards, but I was ready for some pictures that weren’t Christmas related. I wanted to take them in a field and had to figure something else out, because I was never going to make it, even if I sprinted to my spot. I did some research and found a remote for less than $10 that was compatible with my camera. Yes $10 dollars.

So I bought the $10 remote for my camera, and it worked like a charm! I could sit in place, point it at my camera and it would begin the delayed start (this gave me time to put my hand back down).

It was one of those mind blowing moments. I was baffled as to why I darted like a crazy person for so long! I guess the memories of the photo dash will only live on in our memories now and I am definitely OK with that.
Back to the photos! Here are 6 tips to help ensure your family photos turn out great.
6 Tips For Taking Great Family Photos
1. Pose
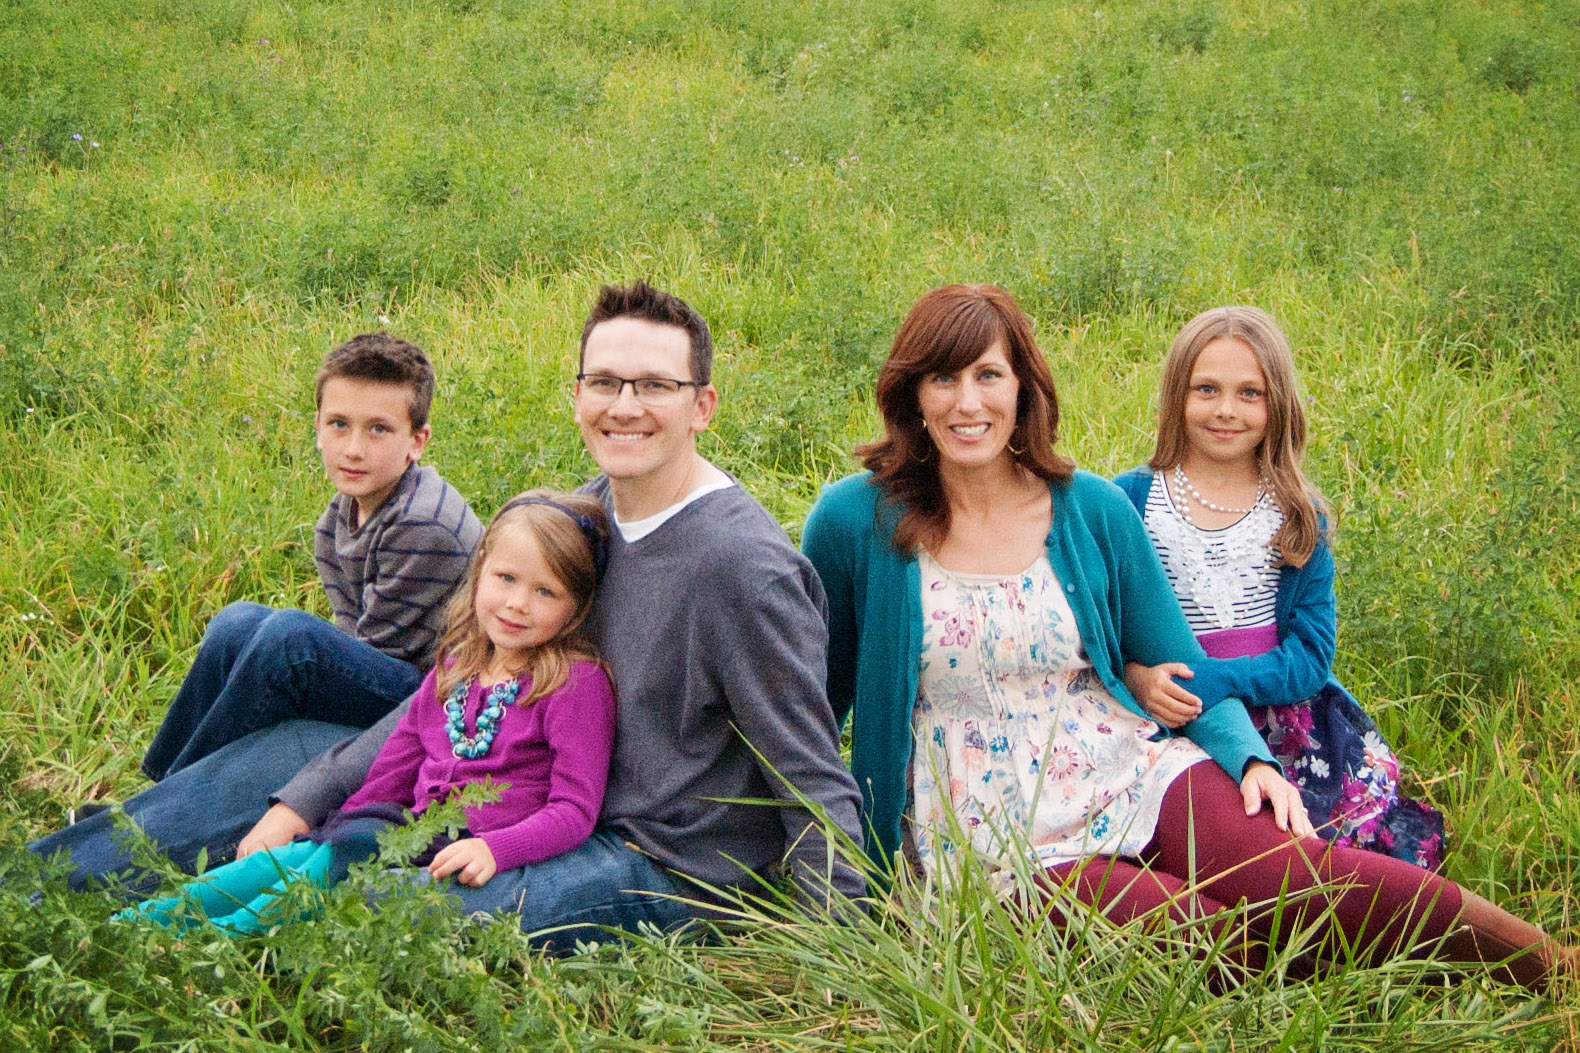
When taking your own photos, you know your family better than anyone. Choose a pose that fits your family. If your family is more casual have your pose reflect that. If you are more formal, than that personality should be reflected in your pictures and pose.
As I mentioned, Pinterest is a great place to gain inspiration. When looking at other family photos, note how many people are in the picture. If you have four people in your family, then look at other family photos with four people. It is probably a good idea to have 3 or 4 different poses in mind to try when you are taking your own photos. If you see a family photo online with a bench that you love, make sure to find a bench to recreate that same pose.
It is also a good idea to have a few stools around for kids to stand on. Play around with heights, so each of your family members is clearly visible.

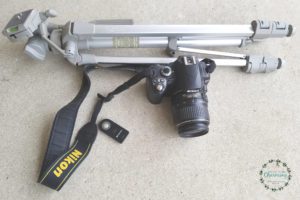
2. Get A Remote & A Tripod
If you are taking your own photos, you will need a few things. I recommend having a tripod and a remote. These tools will make it easier to get a great shot. Both of these items are relatively inexpensive and are incredibly helpful!
3. Location
Choose a location that fits your family. If you love rustic, find an old barn to be in the background. If you are a beach person, go to the beach. Next summer, I really want to take family pictures at a ball field! We live at the ball field all summer anyways…it just fits us!
When choosing the location, think about how long you like to have your photos up. If you want them up all year, then choose something less seasonal in the background. If you take family pictures a lot, then maybe the perfect seasonal picture is what you like and that’s OK too. Just spend a little time thinking about the location to ensure you get the pictures you want.
One year I brought my kids to a park to take pictures. The fall colors were glowing and they are some of my favorite pictures!

4. Outfits
These pictures will be hanging in your home, so having colors that coordinate with your decor is something to consider. It’s not that you have to match your decor, but maybe just don’t choose something that clashes with it. When dressing your family, I prefer coordinating outfits rather than all matching colors (but that’s just me). Outfits are really based on personal preference, one common suggestion to follow is to avoid too much pattern.
One other thing to consider is what parent is holding which child. You don’t want to wear blue and then have your son where blue on your lap…he’ll blend right into you in the picture. For example, if I wear a pink sweater and my daughter has pink pants, I will pose her on the other side of my husband to balance the colors out. Posing and outfit colors need to be considered together.
Lastly, consider your background. If you are taking them in a grassy area, maybe not everyone should wear green. You want everyone to stand out. Again, if this is something you struggle with…look at Pinterest and note the color combinations in other family photos. It will give you some great inspiration.

6. Lighting
One of the best things about taking your own family photos is lighting. You don’t have to stick to an appointment on a super bright sunny day, which casts a lot of shadows. The best day to take photos is on a day with no shadows. No shadows mean the light is even. If you do need to take photos on a sunny day, taking them in the morning or evening will give you the best light. I understand you do need to plan ahead a little, but as you look at the forecast…keep this in mind!

Indoor verse outdoors! When it comes to lighting, unless you have an indoor flash, it is better to take pictures outdoors. If you really need to take indoor pictures, if you have an SLR with a pop up flash, wrap tissue paper over the flash to diffuse the light. You can also add lamps and put sheets of tissue paper over the top shade to filter more light.
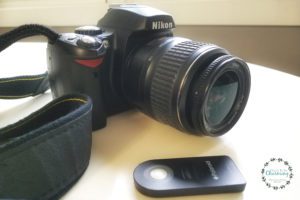
Photo Editing
Even if you have no experience in editing photos, programs such as PicMonkey make it possible for anyone. It allows you to brighten a photo or add a filter to make your family really pop. It is just one more way you can create your own great photos. This program is very user friendly and I can show you the difference on one of my photos!
Here is the photo unedited. It is still a great picture…

Here is the picture with editing. It makes a big difference. With editing software like PicMonkey, you can add a warm glow with one click of a button.

Another way to save money when you take pictures yourself, is on the prints. Especially if you order extra copies for your family. I do recommend an online site called Mpix.
When I used to take senior and family pictures, I always ordered my prints from MPIX. I found that Meijer photo and the other grocery store photo shops do not have the greatest coloring when printing. It is completely acceptable for a picture here and there, but to get great pictures, you need great prints. To compare, I have actually had photos printed at two different places. It is amazing the difference in the prints. Some stores just have a different color tone to their printing.
Taking great pictures, just takes practice. I have never had any formal training, no photo shop lessons…I have just learned by doing. Also remember that sometimes your subjects won’t be as ecstatic as you are to take pictures…

…but it will give you some great pictures to laugh at down the road! .
I’d love to hear from you….do you normally take your own family photos? If so, what are your tips to great pictures! If not, what is your hesitation?
Thanks so much for checking out my post.

Product Love! I just recently purchased this portable hard drive to store all my photos and I love it! I can keep them all in one place instead of on three different memory sticks. See how I organize all my photos Here!
PIN IT FOR LATER!