8 Easy Handmade Ornaments For Christmas
Handmade christmas ornaments add such a personal touch to your tree. A cozy and warm feeling that radiates as you hang each ornament and remember its story. Whether it is an ornament from a Grandma that is no longer here, or a picture of your kids many years ago. Decorating the christmas tree holds so many special memories!
I love making ornaments to give as gifts. When Alyssa was 3 months old and Grady was 2, I made the beautiful handprint ornament you will see below. I am still not quite sure how I had time to make handmade ornaments after just having a baby…but I vaguely remember being a little bit overambitious during that time period. Come to think of it, I may have borrowed a sewing machine too and sewed curtains for her bedroom. I don’t really sew…so I guess I will chalk it up to sleep deprivation and a lack of logical decision making!
Anyways, years later I treasure that ornament and love hanging it on the tree. I love seeing how little their hands used to be. If you are giving them as gifts, make sure you don’t forget to make one extra ornament for your tree!
This post contains affiliate links, which means if you click on or make a purchase, I may receive a small commission. Thank you for your support!
Handmade Christmas Ornament Ideas
Let’s get started! I have listed several easy handmade christmas ornaments below. Four of them include pictures and four of them do not. These ornaments will make great gifts for your family members and will be treasured year after year.
DIY Picture Ornaments
1) Wood Picture Plaque Handmade Christmas Ornament

I created this ornament back in 2011, when my son was 3 and my daughter was 1 (my youngest wasn’t around yet). In this stage of my life I was very interested in non-breakable ornaments!
What you need:
- Wood Plaque (I found this one at Hobby Lobby for around $1). The size can vary…the plaque I have is 5.5″ X 2 3/4″
- Scrapbook Paper
- Cardstock
- Wallet Size Pictures
Start by purchasing a plaque. If it doesn’t have a hole in it already, you will have to drill out a small hole for the ribbon or twine to go in order to hang the ornament.
On the bottom side, cut the scrapbook paper to match the size of the plaque adding enough extra paper to wrap over the edges.
On the top side, cut the paper to match the shape exactly (this will cover any paper from the other side that wraps over).
Once you have the scrapbook paper cut out, glue the paper to the plaque. Start with the bottom side, use a gift card or credit card to smooth the paper out if needed (be careful not to rip the paper). Then glue the scrapbook paper to the top side.
Once the paper is glued, you will just need to use the end of a paper clip to poke through the ornament hole.
Trim your wallet size pictures and print off a message to put on the ornament. It is always a good idea to put the year somewhere in the message.
Now cut out cardstock to frame your picture and message. Next, glue the picture to the frame and the message to the message frame.
Glue your picture and message to the plaque. If you are adding pictures to both sides, then do the same on the opposite side.

Lastly, coat the entire bottom side of the ornament with Modge Podge (it will look hazy, but will dry clear). Let it dry completely, then flip the ornament over and coat the top side with modge podge, making sure to cover the edges as well.
Add a ribbon or twine to hang your ornament and you are all set! We have had our ornament for 8 years and it still looks amazing. It is definitely one of my favorites to hang on the tree.
2) Snow Globe Handmade Christmas Ornament

This is probably one of the easiest picture ornaments to make!
What you will need:
- Plastic Ornament (disc shape)
- White and Crystal Confetti Glitter or Glitter Snow
- Picture- wallet size and laminated
Start by taking a wallet sized picture and laminating it. I went to staples and had my pictures laminated, it didn’t cost very much at all. I actually have a family picture on one side and then just a picture of the kids on the other. Once laminated, trim your pictures down to the size you want them.
Take your plastic ornament, and sprinkle a little confetti glitter inside. Next, role your picture up and slide it through the opening of the ornament. Since it is laminated, once it is inside it will pop back open. You can always use tweezers if you need to adjust it any. Put the ornament top back on, and then write the year on the ornament with a metallic sharpie or paint marker.
It doesn’t get much easier than that!
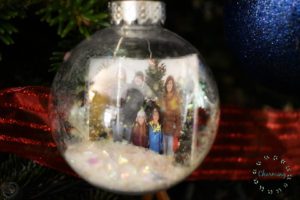
3) Photo Snow Globe Handmade Christmas Ornament
Here is another take on a snow globe ornament. This ornament takes an individual picture and makes it look like you are in a snow globe! It is so fun, I haven’t made this one yet…but it is definitely on my list of ornaments to make. Check out all the details on how to make this ornament at Crafty Morning HERE!

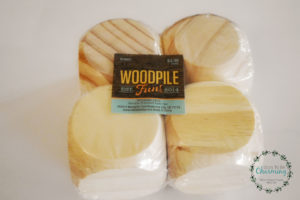
4) School Pictures Photo Block Handmade Christmas Ornament
I came across the concept of a photo block ornament idea on Pinterest, but changed it just a little. I used school pictures and craft blocks instead of alphabet blocks. Having an ornament with your kids school pictures on it every year, would be a great momento!
Here is what you will need:
- Wood block
- Paint
- School Pictures
- Scissors
- Ribbon or Ornament Hook
Pick up some craft blocks at any craft store. I purchased 2″ X 2″ blocks. The corners are actually rounded, which I thought would make for a pretty ornament.
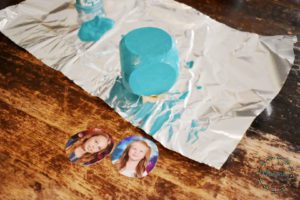
Use any color of paint to cover your blocks. I choose teal of course!
While your block is drying, dig out your child’s school pictures and trim them to fit.
Once the paint is dry, glue the pictures onto the block and then modge podge the entire block. When it is dry, grab a small screw eye hook to place on top. Tie some ribbon to the eye hook and your ornament is finished!

DIY Craft Ornaments
5) Snowman Handprint Handmade Christmas Ornament
This is a precious keepsake, especially if you have younger kids.

This ornament is 9 years old and the one I talked about in the beginning! It’s hard to believe my son was only 2 years old and my daughter only 3 months old. I love that it holds both of their handprints on one ornament, my son’s handprint is on one side and my daughter’s is on the other side.
What you will need:
- Plastic Ornaments- round
- Acrylic Paint- White, Black, Orange, and any color for the hat ( you could always paint a scarf too)
- Ribbon
- Printed Tag- Click Here For Your Free Ornament Tag
To make this ornament, put white paint on your child’s hand. Make sure to have a rag or paper towel handy to help keep the mess to a minimum. The key is to have them spread their fingers out, place the thumb down onto the ornament and then roll the rest of the fingers on. It doesn’t have to be perfect by any means, that is part of the charm. Then slowly remove their fingers and thumb back off of the ornament.
Let the white paint dry, then add dots for the eyes and mouth. An orange shape for the nose and a top hat of any color. You could also add a scarf or buttons onto the snowman if you wanted.
Sprinkle confetti glitter inside the ornament, then print off the tag above. Trim it down and glue or tape the tag to some cardstock to make it sturdier. Remember to write the year on the back of the tag with the names of whose handprints are on the ornament! Another option would be to write or paint the year and names onto the ornament.
Lastly, use ribbon to attach the tag to the ornament and you are finished!
6) Pine Cone Handmade Christmas Ornament
This simple ornament brings a little nature inside.

What you will need:
- Pine Cone
- Twine
- Burlap Ribbon
- Hot Glue Gun
Take your pine cone and hot glue gun. Glue a loop with the twine on top. Then make a bow with the burlap ribbon and glue that on top to cover where the twine is glued to the pine cone.
That is it! You have a beautiful, but simple pine cone ornament.
7) Angel Handmade Christmas Ornament
This angel ornament is one of my favorites. I have used this craft at church before, made them with my kids…it is easy, mess free and looks great!

What you will need:
- Jumbo Butterfly Paperclips
- Silver Pony Beads
- Silver Disk Beads (preferably with fluted edge)
- Ribbon (cut into 1 foot strips)
Click HERE for more details on how to make this ornament!
Take a piece of ribbon and tie it to the butterfly paperclip.
Put the pony bead on first and then the disk bead. You can tie the ribbon again if you don’t want the beads sliding around.
Knot the ribbon at the top to hang on the tree and your ornament is finished!
8) Snowflake Bead Handmade Christmas Ornament
This is a perfect ornament to give as a gift or to do as a craft for a school party (which I am planning to do for my 1st Grader’s party). My daughter and I each made one to check it out and it was so easy to make! Plus the beads look really pretty hanging on the tree!

What you will need:
- Silver Pipe Cleaners
- Pony beads
- Faceted beads
- Propeller beads
- Ribbon
- Pliers (they help turn the ends over…but you can use your fingers)
Start by cutting the pipe cleaners in half. Next take 3 of the short pipe cleaners and twist them together in the middle, so you have 6 stems pointing outwards.
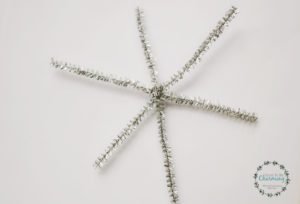
Now add beads onto each stem, leaving enough room to twist the ends. I added about 5 beads per stem (so if you are planning for a class party, about 30 beads per ornament).
Once all the ends are twisted, tie a ribbon on or an ornament hook and your snowflake is finished!
These homemade christmas ornaments will make great gifts, great crafts for a party, or just great mementos for you to enjoy on your own tree! Thanks so much for checking out my post.
